
Not sure how to get Boom Cards in front of your students? There are five ways to use Boom Cards with learners, and each serves a different instructional purpose.
- Assignments – Assign decks directly to a classroom or individual students.
- Fast Pins – Share a login-free link for quick access.
- HyperPlay – Share an assigned deck with a link that requires student login and supports reporting.
- Presentation Mode – Present a deck to learners with the option to collect play data.
- Boom Live – Collaborate with students in real time on the same deck.
The best option depends on whether your goal is independent practice, data collection, teacher-led instruction, or live collaboration.
TABLE OF CONTENTS
- Assigning And Un-Assigning Decks To A Classroom
- Assigning And Un-Assigning To Individual Students.
- Common Scenarios
- Summary
- Need More Help?
Which Option Should I Use?
|
I want to... |
Recommended Method |
|
Track student progress and reports |
Assign |
|
Collect IEP or progress-monitoring data |
Assign |
|
Share practice without requiring logins |
Fast Pin |
|
Share through Google Classroom, Canvas, Schoology, Moodle, Blackboard, PowerSchool, or Seesaw and gather data |
HyperPlay |
|
Differentiate assignments for individual students |
Assign |
|
Present a lesson on a smartboard or projector |
Presentation Mode |
|
Model a deck before independent work |
Presentation Mode |
|
Collect data during a teacher-led lesson |
Presentation Mode |
|
Teach students in real time while monitoring responses |
Boom Live |
|
Run a therapy session, intervention group, or one-on-one lesson |
Boom Live |
Before You Start
Before assigning decks, make sure you have:
✅ Created or imported a classroom
✅ Added students to the classroom
✅ Confirmed students can log in (if using Assignments or HyperPlay)
✅ Located the deck in your Library
Five Ways to Share Boom Cards
Option 1: Assign a Deck
Assigning a deck places it directly in a student's Boom Learning account.
Best For
- Progress monitoring
- IEP data collection
- Independent practice
- Differentiated instruction
- Tracking student performance over time
Benefits
When a deck is assigned:
- Track student progress with detailed reports to monitor performance and growth over time.
- Collect data for progress monitoring and IEP documentation without additional paperwork.
- Use custom play settings to tailor the learning experience for your students.
- Allow students to access assignments from their Boom accounts and view their own results.
- Differentiate instruction easily by assigning different decks to individual students or groups.
Both teachers and students can review performance data.
Important Note
Students need an account to be assigned a deck. Read more below!
Option 2: Fast Pin
Fast Pins generate a shareable link that does not require students to sign in.
Best For
- Independent practice
- Classroom centers
- Substitute teacher activities
- Sharing with students who do not have Boom accounts
- Quick sharing
Benefits
- No student login required — Students can start playing immediately without a Boom account.
- Quick and easy to share — Generate a link and distribute it through printed assignments, LMS platforms, or emails.
- Great for home practice — Families can access activities without managing usernames or passwords.
- Perfect for centers and independent work — Reduces setup time and eliminates login barriers.
- Works with any LMS — Easily share through Google Classroom, Canvas, Schoology, Seesaw, and other platforms.
Important to note with Fast Pins:
- Reports are not collected
- Student progress is not tracked
- Custom play settings are not available
How to Create a Fast Pin
- Open Library
- Locate the deck
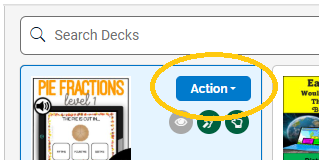
- Select Action
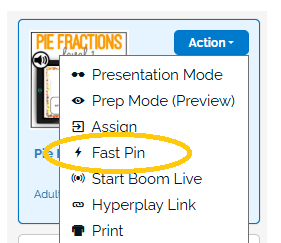
- Choose Fast Pin
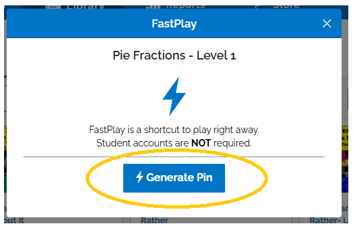
- Click Generate New Pin
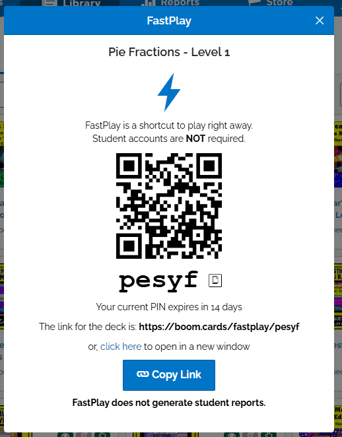
- Copy and share the pin with students
Fast Pin Expiration and Generation
- You will have a QR code, Fast Pin link or a pin to share with your students.
- Paid accounts: Fast Pins expire after 14 days
- Unpaid accounts: Fast Pins expire after 5 days
- Unpaid accounts have a limited number of FastPlays that can be used.
FastPlays = Every time a student accesses a Fast Pin.
Option 3: HyperPlay
HyperPlay generates a shareable link that requires students to sign in before playing.
Best Used For
- In any LMS including, but not limited to:
- Google Classroom
- Canvas
- Clever
- Schoology
- Moodle
- Blackboard
- PowerSchool
- Seesaw
- Student activity is tracked.
- Teacher reports are available when the deck is assigned.
- Custom play settings are available
- Links never expire
- Helps teachers pre plan class work!
Important to Note
Students can play the deck through HyperPlay, but reports will not be available to Teachers or Students unless the deck is also assigned directly to them.
How to Create a HyperPlay Link
- Open Library
- Locate the deck
- Select Action
- Choose HyperPlay Link
- Copy and share the generated URL
Option 4: Presentation Mode
Presentation Mode allows you to present a Boom deck to learners while collecting play data during instruction. It is designed for teacher-led lessons, demonstrations, guided practice, and whole-group learning.
Best For
- Whole-group instruction
- Smartboard lessons
- Small-group teaching
- Guided practice
- Demonstrating a deck before assigning it
- Collecting data during teacher-led activities
Benefits
With Presentation Mode:
- You can present a deck directly to learners.
- Play data is collected during the session.
- Custom Play Settings are honored.
- Deck randomization settings continue to function.
- Session data can be saved to one or more students after the lesson.
Start Presentation Mode
- Open Library.
- Locate your deck.
- Select Action.
- Choose Presentation Mode.
- Present the deck to learners.
- Save the report when the session is complete.
Saving Data
At the end of a session, choose Save Report and select the classroom(s) and student(s) who should receive the play data. Saved Presentation Mode data can later be found in:
- Reports
- Classrooms & Categories reports
- The classroom where the data was saved
Important Notes
- Play data is collected throughout the session.
- Premium subscribers can save reports to one or more students.
- If a membership expires, Presentation Mode data is no longer accessible.
Option 5: Boom Live
Boom Live is a real-time collaborative teaching mode that allows multiple participants to work in the same Boom deck together. Teachers can see student mouse movements and responses as they happen. Students can collaborate and complete activities as a team.
Best For
- Small-group instruction
- Therapy sessions
- Intervention groups
- One-on-one teaching
- Modeling and guided practice
- Remote learning sessions
Benefits
With Boom Live:
- Multiple students can participate at the same time.
- Teachers can monitor student actions live.
- Students can collaborate on activities.
- Teachers control who can interact with the deck.
- Sessions can be joined using either a link or a PIN.
Important Notes
- Boom Live is available to users with a paid membership.
- Students do not need to log in to a Boom account.
- No student reports are saved from Boom Live sessions.
Creating a Boom Live Session
- Open Library.
- Locate the deck you want to use.
- Select Action.
- Choose Start Boom Live.
- Configure your session settings.
- Click Start Session.
- Share either the session PIN or session link with students.
Managing a Session
During a live session, teachers can:
- Turn student interaction on or off for the entire group.
- Choose which students have mouse control.
- Choose which students can type.
- Choose which students can click buttons or submit answers.
- End the session at any time.
Assigning and Un-Assigning Decks to a Classroom
You can assign and unassign decks from either the Library tab or the Classes tab.
⚠️Students can only see 40 assignments at one time.
If students cannot find a recently assigned deck, review older assignments and remove those that are no longer needed.
Assign from the Library
- Open your Library.
- Find the deck you want to assign.
- Click the Action button next to the deck.
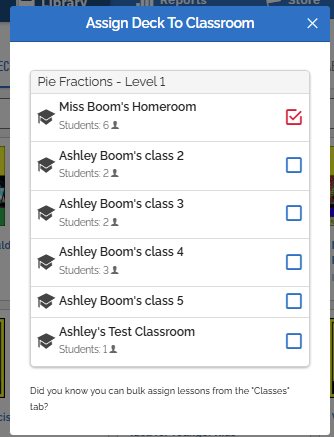
- Select Assign from the dropdown menu.
- A list of your classrooms will appear.
- Check the box next to the classroom(s) that should receive the deck.
- Uncheck a classroom to remove the assignment.
The assignment is saved automatically. Students in those classrooms will now see the deck in their assigned work.
Unassign From The Library
Uncheck the box next to the classroom
Assign from the Classes tab
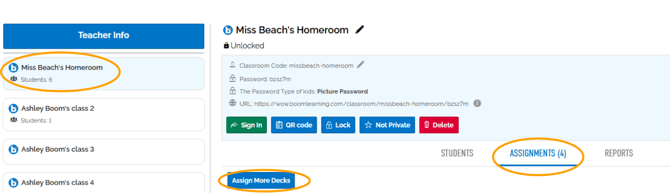
- Open the Classes tab.
- Select a classroom.
- Open the Assignments sub-tab.
- Click Assign More Decks.
- Search for the deck.
- Check the box to assign it.
Unassign From The Classes Tab
Uncheck the box next to the deck 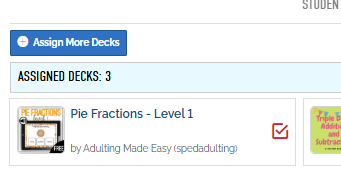
What Happens When a Deck Is Unassigned?
When a deck is unassigned:
-
Students can no longer access the assignment.
-
Students can no longer view associated reports.
-
Teachers can still access saved reports and data.
Assigning and Un-Assigning to Individual Students
Sometimes students need assignments that differ from the rest of the class. You can assign or remove decks for individual students directly from the Classes tab.
Individual Assignment Steps
-
Open Classes.
-
Locate the student.
-
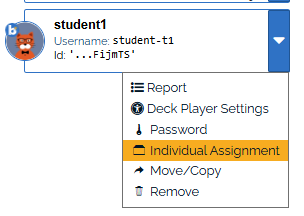
Open the student's dropdown menu.
-
Select Individual Assignment.
- Search for a deck.
- Check the box to assign it.
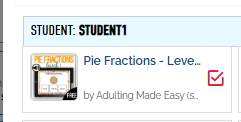
Unassign from an individual Student
Uncheck the box to unassign it
Why Can't a Student See an Assigned Deck?
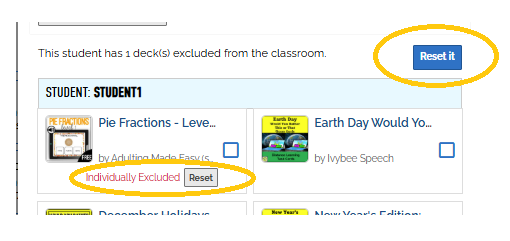
If a deck was previously unassigned from an individual student, that student is placed on an exclusion list for that deck. Even if the deck is later assigned to the whole class, that student will not see it automatically.
You can change this from inside the individual assignment section.
Reset an individual deck or all excluded decks all at once using the provided reset buttons.
Why would you want to assign a deck to an individual example: Differentiating Assignments
A special education teacher may have students working at different skill levels.
For example, you can:
-
Assign one deck to the entire class.
- Assign an additional communication deck to AAC users.
- Assign a simplified version to emerging learners.
- Assign extension activities to students ready for a challenge.
- This allows each student to receive support at the level that works best for them.
Common Scenarios
I need data for progress monitoring or IEP meetings.
Use: Assign the deck directly to students. Reports will be available.
I want students to practice at home without creating accounts.
Use: Fast Pin. No login is required.
I use Google Classroom or Canvas.
Use: HyperPlay. It works well with learning management systems.
I need different assignments for different students.
Use: Individual Assignments.
I need custom play settings and reports but want to share through my LMS.
Use: HyperPlay.
Summary
Boom Learning offers several ways to share and use Boom Cards, each designed for different teaching needs. Assignments are best when you want students to complete work independently and generate reports for progress monitoring. Fast Pins provide quick, login-free access to a deck, making them ideal for homework, centers, and practice activities. HyperPlay combines the convenience of link sharing with the ability to track student performance, making it a great option for Google Classroom, Canvas, and other learning management systems.
For teacher-led instruction, Presentation Mode allows you to display a deck to learners while collecting play data that can be saved to students and reviewed later. Boom Live supports real-time collaboration, allowing teachers and students to interact with the same deck simultaneously, making it ideal for small groups, intervention sessions, therapy, and guided practice. Whether your goal is independent learning, data collection, whole-group instruction, or live collaboration, Boom Learning provides a sharing option to fit your classroom needs.
Need More Help?
Our Boom Training Academy materials help educators learn the basics, find resources faster, and use Boom with confidence so that you can spend less time figuring out technology and more time with your students.
Interested? Access and interact with Courses here: Boom Training Academy
Are you a part of a managed Boom School account? Get private training! Ask your school or district administrator to schedule a complimentary training session with us.
If you have any further questions, please feel free to email us at help@boomlearning.com or call us at (833) WOW-BOOM. A real human will happily help you!