You can also connect with other teachers for ideas on how to use Boom Cards in our Teaching with Boom Cards group on Facebook.
TABLE OF CONTENTS
- Finding Boom Decks
- Memberships, Boom Cards, and Points - what are they?
- Setting up a Teacher Profile
- Setting up Students
- Assigning Boom Cards
- Grading and Reports
- Creating and Organizing Boom Cards
- New To Boom Learning? You're Not Alone.
Finding Boom Decks in the Store
To get started, you will need to find decks you like in the Boom Store!
We have a variety of decks created and sold by teachers just like you!
Here is a video explaining how to find decks:
Memberships, Boom Cards, and Points - what are they?
Memberships provide the data processing, hosting, and related elements of the Boom Learning product, including student progress reporting and the ability to create a curriculum by creating your own Boom Cards. Only paid memberships have access to live and stored student success reports.
Each of the membership levels offers different features. To explore those different membership levels and select the right membership for you, please see the chart available here: https://wow.boomlearning.com/join
Here are some other helpful articles:
Points - What are they and why do you use them
Buying Boom Cards for a school
Setting up a Teacher Profile
Once you've created an account, you'll want to fill in some basic information on your profile. For steps on how to add a picture, name, and other profile details, take a look at: Setting up Your Profile.
There is nothing to download or install. Your online account holds all the Boom Cards you make or purchase, as well as all student account data.
Setting up Students
Create a new classroom by going to the "Classes" tab and clicking on "New Classroom."

If you create a new classroom, you can add an individual student by using the "New Student" button, or add all the students in your class with the "Add Many Students" button.

Students can also be imported from an LMS - such as Google, Microsoft, Clever, Classlink, or Canvas. Canvas is only available for school accounts that have initiated that connection. You can read more about Canvas here.
Here is a video explaining:
Google Classroom users will find steps for Setting Up Google Classroom with Boom Learning here.
ClassLink users can learn how to integrate with ClassLink here.
Clever users should look for instructions on Linking a Clever Account here.
There are a number of ways students can log in to Boom Learning. They can log in using Google, use a Hyperlink to be automatically directed, or go to the Boom Learning login page and type in their username and password.
You'll find additional information on each of these methods in the FAQ: Adding Students to Classrooms Manually.
There are letters you can download and send to your students explaining how to sign in with the different sign-in methods attached to the FAQ: Quick Start Guide for Students and Parents
Sharing Boom Cards with students
Once you have decks in your account, you will need to share them with your students!
You can share decks using Presentation mode, a Fast Pin, and HyperPlay Links.
Assigning Boom Cards
You can collect students' play data by assigning them to a student individually or a Classroom. We give instructions on how in our Article: Assigning, Un-assigning, and Playing Boom Cards.
For steps on how to assign decks you've made yourself, see Assign your own Decks to Students with Private Publishing.
Grading and Reports
Boom Cards give students instant feedback as they play through the deck. For teachers with a membership that hosts student data, teachers can view progress and performance on the reports page. Data can be viewed either by an individual student or for the whole classroom.
Get a quick tour of the Reports tab in the video below.
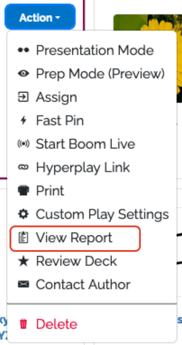
Reports can also be viewed by deck by going through the Library tab to locate the specific deck you'd like to see a report from. Click on the blue "Action" button to open the drop-down menu and then click on "View Report" to open that deck's report.
From the classroom report, teachers can see assigned decks, who has not yet started on assignments, who has completed all assigned decks, and who is in the process of working through a deck. We also offer a Live Monitoring feature for just-in-time interventions.
You will also see their score so far as well as the number of times they have played through the deck. Find additional information on how to understand and use Student Reports here.
Creating and Organizing Boom Cards
Boom Cards are created using the Deck Editor within the Studio page. Click here to be taken to your Studio page, where you can begin to upload images and record sounds to create cards from. Creating Boom Cards is fun and rewarding.
To get started making your own Boom Cards, go to your Studio tab and open the "Get Started Creating Boom Cards" deck that we provide automatically. This deck will walk you through the basic Studio tools and give you an opportunity to explore.
To continue on your journey of learning how to make your own Boom Card decks, activities, assessments, and games, check out our FAQ: Quick Start Guide for Creating Boom Cards.
Getting Connected To Our Community
Discuss selling those decks you've made in the Boom Store in the Boom Publisher group, which is reserved just for Public Author-related topics and techniques.
Organizing as you Create
For help organizing images, see our FAQ: Managing Images in your Studio
You can find a list of the terms we use and their definitions here: Boom Learning Terminology - Helpful Definitions
New to Boom Learning? You're not alone.
Our Boom Training Academy materials help educators learn the basics, find resources faster, and use Boom with confidence so that you can spend less time figuring out technology and more time with your students.
Interested? Download Training materials here! New Interactive Learning platform coming soon!
Are you a part of a managed Boom School account? Get private training! Ask your school or district administrator to schedule a complimentary training session with us.
If you have any further questions, please feel free to email us at help@boomlearning.com or call us at (833) WOW-BOOM. A real human will happily help you!